Angular앱에 Web Push 구현하기
서론
현재 Web Push는 무료[1]이며 아래 조건들만 만족하면 이메일보다는 훨씬 나은것은 물론이고. SMS, 카카오톡 알림급의 전달력을 가진 메시지를 무제한으로 보낼 수 있다.
- 브라우저가 Web Push를 지원할 것
- 사용자가 웹 알림 권한을 허용할 것
- 웹 워커를 등록한 브라우저 프로세스가 실행되어 있을 것
Web Push를 구현하려면 원래 firebase 패키지를 설치하고. 사용자가 웹 알림 권한을 허용할 때 Firebase Cloud Messaging (이하 FCP) 플랫폼에 엔드포인트를 등록하는 코드를 직접 작성해야 한다.
하지만 Angular는 Google에서 개발하는 것이라 그런지 @angular/service-worker 패키지에 이미 해당 기능이 구현되어 있어 쉽게 Web Push를 구현할 수 있다.
Angular의 @angular/service-worker패키지는 해당 기능을 포함해 App Shell, Runtime Caching, Smart Updates기능을 쉽게 구현할 수 있도록 기능을 제공하고 있다. 17년 12월 발표한 Service Worker 소개자료에 따르면 이를 Automatic Progressive Web Apps 로 소개하고 있다.
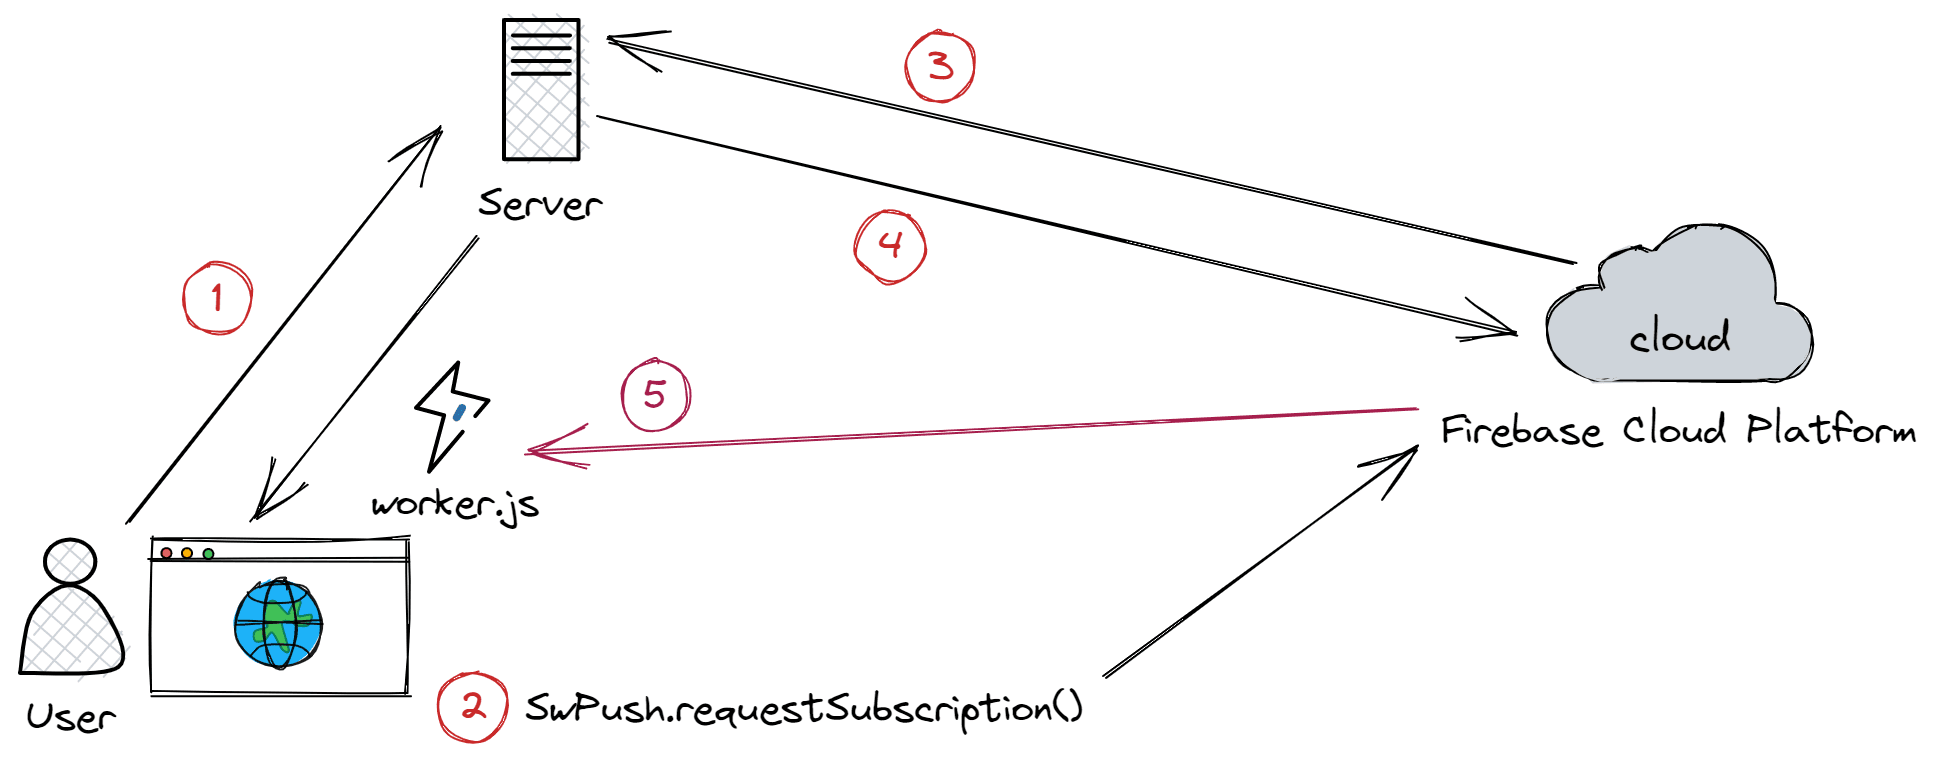
Web Push의 시스템 구조

- 사용자가 웹 서비스에 접속하면 웹 워커를 설치하게 된다
- 알림 버튼을 클릭하면
SwPush.requestSubscription메서드를 호출하여 FCP에 등록하고PushSubscription객체를 응답받는다 PushSubscription객체를 서버에 전송하여 어딘가에 저장해둔다- 서버에서 메시지를
PushSubscription을 참고하여 전송한다 - FCP에서
PushSubscription객체에 해당하는 웹 워커에게 메시지를 전달한다. 해당 웹 워커는 이를 읽어 알림을 출력한다
SwPush는 Angular에서 제공하는 푸시 알림 등록 구현체이다. 이 서비스를 통해 알림 구독 자체를 나타내는 PushSubscription객체를 만들 수 있다. 이 객체는 json으로 변환 가능하므로 서버에 보내 저장했다가 원할 때 메시지를 보내도록 하는것이다.
Web Push 구현하기
web-push 설치 밎 키 생성하기
npm install --save web-push

npx web-push generate-vapid-keys

=======================================

Public Key:
{VAPID 공개키}

Private Key:
{VAPID 비밀키}

=======================================
위 명령 수행시 나오는 공개키와 비밀키는 해당 웹 서버기준으로 발급되는 것이므로 잘 기억해둔다. 서비스 도중에 이것이 바뀌면 기존 구독들에게 메시지를 보낼 수 없게 된다.
공개키는 environment.ts에 추가하고. .dotenv파일에는 둘 다 저장하여 백엔드에서 읽어다 쓸 수 있도록 하면 된다.
// This file can be replaced during build by using the `fileReplacements` array.
// `ng build` replaces `environment.ts` with `environment.prod.ts`.
// The list of file replacements can be found in `angular.json`.

export const environment = {
  production: false,
  VAPIDPublicKey: '{VAPID 공개키}',
}

/*
 * For easier debugging in development mode, you can import the following file
 * to ignore zone related error stack frames such as `zone.run`, `zoneDelegate.invokeTask`.
 *
 * This import should be commented out in production mode because it will have a negative impact
 * on performance if an error is thrown.
 */
// import 'zone.js/plugins/zone-error';  // Included with Angular CLI.
# .dotenv
VAPID_PUBLIC_KEY={VAPID 공개키}
VAPID_PRIVATE_KEY={VAPID 비밀키}Service Worker 패키지 추가
ng add @angular/pwa --project <project-name>위 명령어를 사용하여 앱에 기본 서비스워커를 추가한다. 프로젝트에 서비스워커 추가하기에 해당 명령의 변경사항이 나와 있는데 직접 수정해도 된다.
이제 앱을 빌드하면 결과물에 ngsw-worker.js가 추가되고. 이 파일이 AppModule의 ServiceWorkerModule import에 추가되어 있다. 이 파일이 위 소개자료에 있는 기능들의 Angular 구현체이다.
@NgModule({
  declarations: [AppComponent, NotiComponent],
  imports: [ServiceWorkerModule.register('ngsw-worker.js')],
  providers: [WindowService],
  bootstrap: [AppComponent],
})
export class AppModule {}
알림 버튼 만들기
먼저 브라우저가 Web Push를 지원하는지 확인해야 한다. ua-parser-js와 compare-versions패키지를 활용하여 구분하고 가능한 경우 알림 버튼을 노출한다.
‘22 7/27 기준 web-push는 safari를 지원하지 않는다 web-push 브라우저 지원 범위 참고
import { compare } from 'compare-versions'
import UAParser from 'ua-parser-js'

@Injectable()
export class WindowService {
  isSupportNotification = false

  constructor() {
    const {
      browser: { name, version },
    } = new UAParser().getResult()

    // 공식 문서 기준으로 필터링
    this.isSupportNotification =
      'Notification' in window &&
      !!version &&
      (name === 'Chrome' ||
        compare(version, '52', '>=') ||
        name === 'Edge' ||
        compare(version, '17', '>=') ||
        name === 'Firefox' ||
        compare(version, '46', '>='))
  }
}
다음 컴포넌트에서 서비스를 DI받아 버튼 노출을 제어한다. 클릭 시 위에 설명한대로 SwPush.requestSubscription메서드를 호출하여 PushSubscription객체를 받고. 서버에 전송하여 저장하도록 한다.
import { SwPush } from '@angular/service-worker'
import { environment } from '../environments/environment'

@Component({
  template: `
    <button
      type="button"
      (click)="onClick()"
      *ngIf="win.isSupportNotification; else notSupport"
    >
      알림 구독하기
    </button>
    <ng-template #notSupport> 알림을 지원하지 않는 브라우저입니다 </ng-template>
  `,
})
export class NotificationComponent {
  constructor(
    private swPush: SwPush,
    private http: HttpClient,
    protected win: WindowService
  ) {}

  onClick() {
    this.swPush
      .requestSubscription({ serverPublicKey: environment.VAPIDPublicKey })
      .then((pushSubscription) => {
        this.http.post('/api/subscribe', pushSubscription).subscribe()
      })
  }
}
백엔드 webpush 설정
위에서 생성한 키를 읽어다 서버 실행과 동시에 web-push모듈을 초기화한다. 예제에서는 express 웹 서버를 사용했다.
web-push 모듈 사용시 메서드를 찾지 못한다는 류의 에러가 발생할 경우 예제 코드처럼 defaultExport를 사용하도록 한다.
import webpush from 'web-push'

// .dotenv 읽기
require('dotenv').config()

// web-push 모듈 초기화
webpush.setVapidDetails(
  'mailto: {관리용 이메일 주소 기입}',
  process.env.VAPID_PUBLIC_KEY,
  process.env.VAPID_PRIVATE_KEY
)
그 다음 클라이언트에서 전송한 PushSubscription 객체를 받아 저장하는 라우터를 작성한다.
import { Router, json, urlencoded } from 'express'

const router = Router()

router.use(json({ limit: '5mb' }))
router.use(urlencoded({ limit: '5mb', extended: true }))

let pushSubscription = null

router.get('/api/subscribe', (req, res) => {
  pushSubscription = req.body
  res.send('ok').end()
})
알림을 보내야 할 땐 아래와 같이 저장했던 pushSubscription을 sendNotification의 인자로 보내면 된다. 두 번째 인자에 메시지를 문자열이나 버퍼로 만들어 넘기면 되는데. ServiceWorkerRegistration.showNotification메서드로 OS알림을 출력할 것이므로 json으로 만들어 넣는게 일반적이다.
import webpush from 'web-push'

webpush
  .sendNotification(
    pushSubscription,
    JSON.stringify({ title: 'hello', body: 'world' })
  )
  .then((res) => {
    console.log(res)
  })
  .catch((err) => {
    console.error(err)
  })
웹 워커에서 OS알림 띄우기
이제 마지막으로 웹 워커에서 FCP에서 전송한 알림을 OS에 띄워주면 된다. @angular/pwa설치 후 번들에 만들어지는 ngsw-worker.js에는 이 코드가 없으므로. 이 부분을 직접 구현하여 사용해야 한다.
주석에 명시된대로 해당 js파일은 window가 아니라 WorkerGlobalScope에서 실행되기 때문에 코드 작성시 주의해야 한다.
/**
 * WorkerGlobalScope에서 동작하는 코드임. 컨텍스트에 대한 정보는 아래 문서 참고할 것
 * https://developer.mozilla.org/en-US/docs/Web/API/WorkerGlobalScope
 *
 * ngsw-worker.js 는 angular.json의 빌더 설정에 "serviceWorker" "ngswConfigPath"
 * 값이 설정되어 있으면 빌드 완료 후 자동으로 생성되는 Angular의 서비스 워커 구현 스크립트임
 *
 * 웹 푸시만 필요하다면 없어도 되지만 Automatic Service Worker의 기능 활용을 위해 포함한다
 */
importScripts('ngsw-worker.js')

/**
 * Angular의 SwPush 서비스를 이용해 생성한 구독은 아래 인스턴스의 형대로 저장됨
 * https://developer.mozilla.org/en-US/docs/Web/API/PushSubscription
 *
 *
 * 서버에서 각 이벤트 발생 시 `web-push`라이브러리를 사용해 위에서 만든 구독 정보로
 * 데이터를 보내는데. 해당 구독 정보와 매칭되는 웹 워커에서 아래 이벤트가 발생함
 * https://developer.mozilla.org/en-US/docs/Web/API/PushEvent
 */
self.addEventListener('push', (e) => {
  const { title, body, ...data } = e.data.json()

  if (!title || !body) {
    return
  }

  self.registration.showNotification(title, { body, data })
})

/**
 * OS에 뜬 알림을 클릭했을 때 하는 동작. 예제는 url이 있다면 열어주는 코드이다
 */
self.addEventListener('notificationclick', (e) => {
  const url = e.notification?.data?.url

  if (!url) {
    return
  }

  self.clients.openWindow(url)
})
위 파일을 my-worker.js 로 만들어 src폴더 밑에 두고. angular.json과 app.module.ts를 수정한다
{
  "targets": {
    "build": {
      "options": {
        "assets": [
          "src/my-worker.js" // 빌드에 포함될 수 있도록 추가
        ]
      }
    }
  }
}@NgModule({
declarations: [AppComponent, NotiComponent],
imports: [
ServiceWorkerModule.register('my-worker.js'), // 수정
],
providers: [WindowService],
bootstrap: [AppComponent],
})
export class AppModule {}
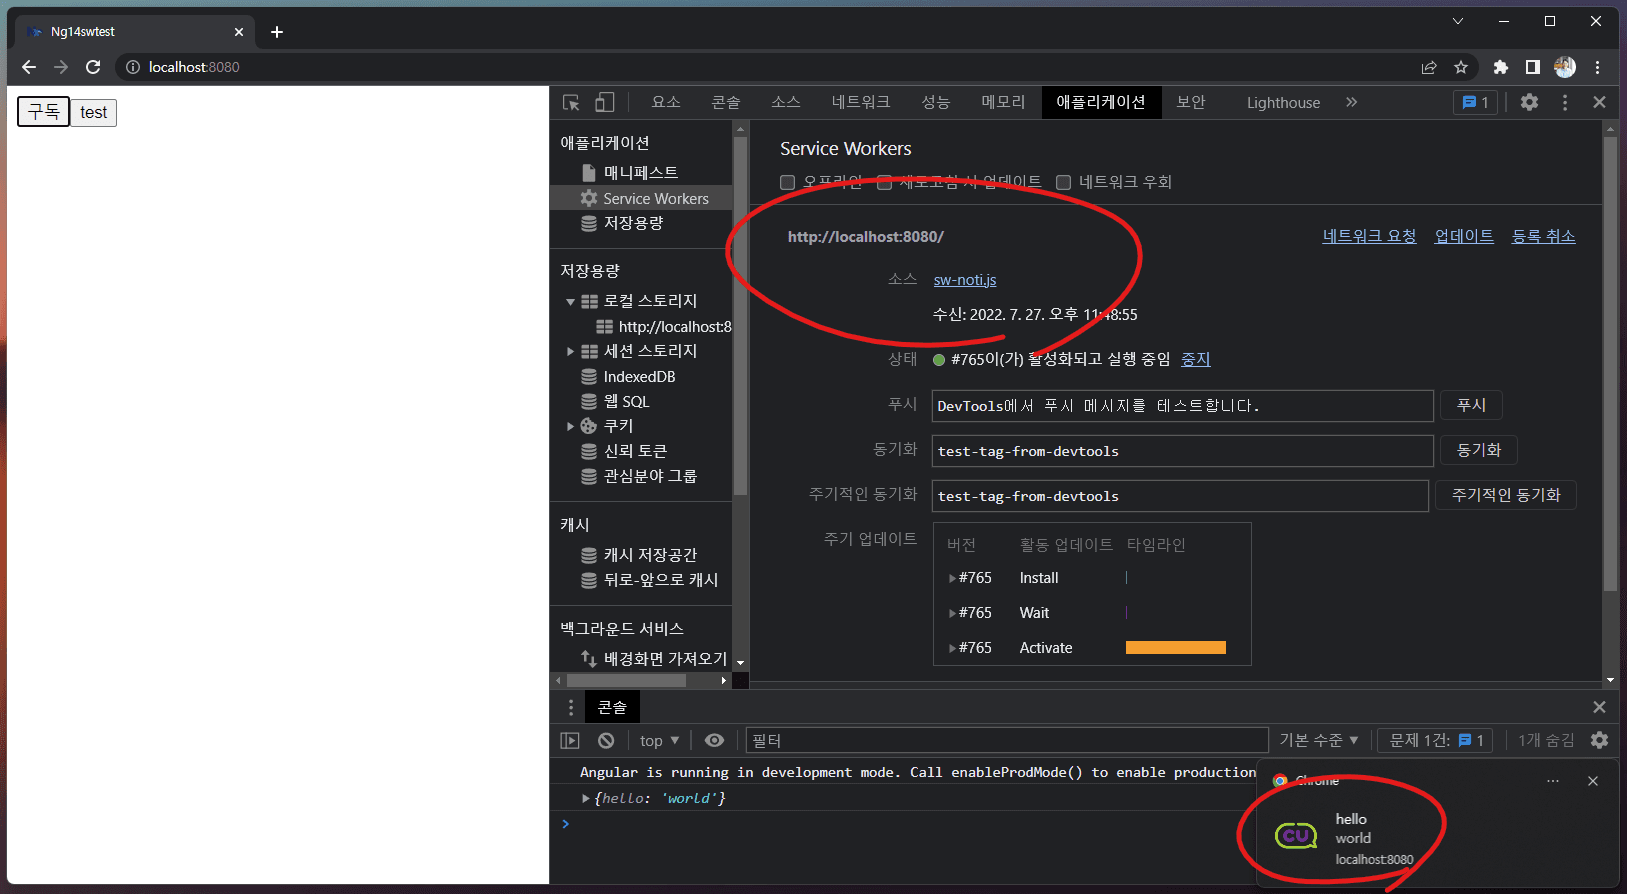
위처럼 http 에 localhost 에서도 잘 동작하는것을 확인할 수 있다. cu 로고는 OS알림을 띄울 때 추가로 넣을 수 있으니 showNotification API를 참고하면 된다.
글을 작성하며 테스트해본 코드를 Angular 14 웹 푸시 테스트 리포지토리에 푸시해 두었다. 서버 실행 방법을 README.md 에 적어두었으니 클론받아서 직접 테스트해볼 수 있다. 본문과 다르게 백엔드를 SSR로 구현해놓았으므로 참고 바란다.